Using Activity Replay
This Application Recording Policy option lets you configure a recording policy that specifies when to start/stop recording before and after an Alert is triggered. (Windows-based policies only)
For example, you create an alert rule that triggers when a user copies sensitive text, such as a credit card number. When you receive the alert, you want to know the user's previous actions - Where did the user copy the credit card number from? You may also want information on what the user did once the alert triggered - maybe the user pasted the credit number into a confidential document after copying it.
When you select this option, ObserveIT continuously records metadata and switches to video before and after the defined triggers.
Activity Replay records only content related to the suspicious activity. This lets you maintain your employees' privacy while protecting against potential threats. With Activity Replay, your total cost of ownership (TCO) for the ObserveIT solution improves because you use less storage space.
Activity Replay is supported in offline mode. When offline mode is enabled, and there is a disconnection between the Agents and Applications server, the Agents will cache a local copy of the recorded data as configured in your Activity Replay settings. By default, Activity Replay storage is set to 300MB in addition to the offline data limit of 500MB. (For more information about offline mode, see Offline Recording Policy.)
To use the Activity Replay options, select the Alert Rule you want and choose the Start Video Recording action (see Start Video Recording).
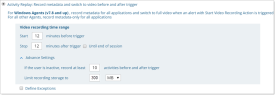
You focus the Activity Replay recording policy by defining the video recording time range.
In addition, you can specify which applications to include/exclude from being recorded.
Include/Exclude URLs from recording by using “*facebook.com*” and not “*www.facebook.com*” or “http://www.facebook.com” or “http://facebook.com”. Starting with Google Chrome 69, Google has changed the displayed URL in the Address Bar. It now hides everything in front of a site’s actual domain name by default. This includes the scheme (for example "HTTP", "HTTPS:") and trivial subdomains (for example " "WWW" and "M") from steady state.
This option is available for Windows Agents version 7.8 and up only.
-
To activate Activity Replay, select the Activity Replay: Record metadata and switch to video before and after trigger option.
-
Video recording time range area: Define the time range. Define the number of minutes before and after the event that you want to record.
-
If the user is inactive, record at least x activities before and after trigger: From the Advanced Settings, define the number of activities to record before and after the trigger. Setting this option, ensures that you will see activities that occurred before/after the event, even if the user was inactive during the time range defined.
If you specify both Video recording time range and User activities, the option with the greater amount of data is used.
-
Limit recording storage to: From the Advanced Settings, you can limit recording storage. This option has priority over the other options. The Activity Replay buffer will not exceed the Limit recording storage value on the monitored endpoint. If the storage limit is reached, new screenshots will overwrite the oldest screenshots.
Recording storage limit is independent of any offline storage you may have configured. (For more information about offline storage, see Offline Recording Policy.)
-
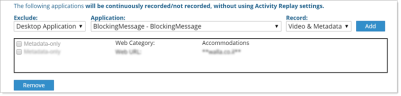
Define Exceptions lets you define exceptions to the Activity Replay options you configured. The applications you add to the list, are continuously recorded/not recorded, regardless of Alerts and Activity Replay settings. Do the following:
-
From the Exclude drop-down list, select Web URL, Desktop Application, or Web Category.
- In the Application field, select or enter the name of the application.
- To continuously record video and metadata for the selected application, select Video & Metadata from the Record drop-down list.
- To continuously record only metadata for the selected application, select Metadata-only from the Record drop-down list.
- To continuously not record for the selected application, select None from the Record drop-down list.
-
Click Add to add the application. To remove an application, select it from the list and click Remove.
In the example below the Web Category, Accommodations, is continuously recorded, metadata only. No video will be recorded.
-
-
Click Save.
Related Topics:
Recording Video and Metadata for All Applications
Recording Video and Metadata for Defined Applications
Recording Metadata-only for All Applications