Proofpoint | ObserveIT On-Premises Insider Threat Management
Defining the "Did What?" Conditions
In the Did What section of the Create Alert Rule page, you can define (or edit) conditions of suspicious user activities which would trigger an alert, based on recorded ObserveIT metadata for Windows, Mac and Unix/Linux operating systems.
On Windows and Mac operating systems for example, you can search for users who logged in, ran a specific application, viewed a specific window title, visited a URL, uploaded a tracked file to a website/web application or cloud storage sync folder, typed a blacklisted command/phrase, copied text with sensitive content to the clipboard, executed an SQL command containing keywords (Windows only), and so on.
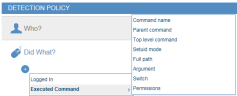
On Unix/Linux operating systems, you can search for users who logged in, executed a specific command (based on command name, parent command, top level command, setuid mode, full path, arguments, command switches) or acted under a different user's permissions.
The only "Did What?" condition you can configure for a prevention rule is "Executed Command" based on command name and/or arguments. For details, see Executed Command.
Important: You must take the alert frequency into account when defining conditions. The alert frequency options (specified in the rule details above the "Did What?" section) control whether the alert will be triggered every time the defined conditions are met, or not more than once per user session. For details, see Alert Frequency in Defining Rule Details.
Depending on your operating system, numerous options are available to help you configure the exact conditions that must be met in order for the alert rule to be active. Instructions and example scenarios are provided in subsequent topics to help you understand how to configure Did What conditions, using the following options available from the Did What section of the Create Alert Rule page:
For a summary of all conditions and options, see "Did What?" Conditions Summary.
Logged In: Available for Windows, Mac, and Linux/Unix operating systems. Use this option to generate an alert when a user logs in to a Windows, Mac, or Unix/Linux computer. You can restrict alert generation for "Logged in" events by specifying additional criteria, such as who logged in, when, on which computer the login took place, or from which client machine.
Ran Application: Available for Windows and Mac operating systems. Use these options: Application name, Application full path, Process name, Window title, or Permission level to generate an alert when a user runs one or more particular applications on a Windows computer. Running certain applications may signal, for example, that the user may be tampering with settings that may affect system security, user permissions, installed software/services, accessing sensitive data, or attempting to exfiltrate data.
Visited URL: Available for Windows and Mac operating systems. Use these options: Site, URL prefix, Any part of URL, or Website Category to prevent users accessing sensitive or prohibited websites or webpages. An alert is generated when a user visits a particular website, webpage, area of a website, or Website category that belongs to a list of predefined categories that employees are forbidden to browse.
Brought in a File - Did What: Available for Windows and Mac operating systems. Use this option to generate an alert when a file is downloaded from a website/web applicatin, an attachment is saved from an email client, or a file is taken from a cloud storage sync folder.
Exfiltrated File: Available for Windows and Mac-based operating systems. Use this option to generate an alert when a tracked or non-tracked file is moved/copied to any destination, uploaded to a specific website/web application, moved/copied to the local sync folder of a cloud file sharing service, or copied or downloaded to a USB device. This option is also used when file is exfiltrated via email or a file is exfiltrated by attaching it to an email client.
Email: Available for Windows and Mac operating systems. Use this option to generate an alert when an email is sent using an email client, a file is exfiltrated via email, a file is exfiltrated by attaching it to an email client or a file is saved from an email client.
Used Keyboard (Key-logging): Available for Windows and Mac operating systems. Use this option to generate an alert when the user:
-
Types blacklisted commands (within CMD, Powershell, or Putty), blacklisted phrases in an email, or sensitive words while browsing social media websites
-
Presses special keys, such as PrtScr for taking screenshots on Windows
-
Presses key combinations, such as Alt and PrtScr for taking screenshots of the active application in focus
Copied Text: Available for Windows and Mac operating systems. Use this option to generate an alert when a user copies to the clipboard text that has sensitive or confidential content.
Executed SQL Command: Available for Windows operating systems. Use this option to generate an alert when a user executes a particular SQL command against a database (in Windows). An alert can be generated if a user accesses a database in order to perform harmful activity.
Executed Command: Available for Unix operating systems. Use these options: Command name, Parent command, Top level command, Setuid mode, Full path, Argument, Switch, Permissions to generate an alert when a user executes a particular Unix/Linux command. This is useful to track when a user performs some action on sensitive data, files, directories, paths, user permissions, or system configuration settings.
Pasted - Did What: Available for Windows and Mac operating systems. Use this option to generate an alert when a user pastes text, file, folders, or images with sensitive or confidential content. Alerts are triggered by keyboard and point-click paste actions.
Detect Connected USB - Did What: Available for Windows and Mac-based operating systems. Use this option to generate an alert when a any USB device is connected, when any white listed USB device is connected, when any unlisted USB device is connected or when a specific USB device is connected.
-
Use the operators is, is not, contains, does not contain, starts with, does not start with, ends with, does not end with, empty, or not empty with these options.
The following procedure provides an overview of the steps required to define the Did What? conditions for alert rules.
Before you begin, make sure that you have read "Rules for Configuring Alert Conditions" described in Understanding the Logic for Defining Rule Conditions.
To define the "Did What?" conditions
-
In the Create Alert Rule page, open the Did What section by clicking
 or the Edit
 icon.
icon. The following example shows the "Did What?" options available for Unix systems when creating a new alert type rule.
-
To define a new condition for the alert rule, click the
 icon.
icon. -
From the drop-down menu, select the group category and specific user actions that you want to test in your condition (as described above).
The available group categories depend on the current operating system (defined in the rule details above the "Did What?" section); only Logged In applies to both Windows and Unix/Linux systems.
-
Select the required operator for the condition from the drop-down list (for example, is, is not, does not start with, contains, and so on). When Lists are supported (see Understanding Lists in ObserveIT), the operator for the condition might be different. For example, "contains" in "Values mode" would be "contains value from the list" in List mode.
-
Specify the value(s) against which to test the condition. Note that you can enter multiple values separated by commas (using the "OR" logic). For details, see Understanding the Logic for Defining Rule Conditions.
When Lists are supported, you can choose to select a predefined List instead of entering a set of values. List names appear as hyperlinks in the Did What? condition; clicking a List name opens the Edit List page in which you can view and edit the List contents. Note that only Admin role users can edit Lists. For more information, see Editing Lists.
-
Repeat the above steps for each condition that you want to define.
-
When you have finished, click Save to save your settings.


Example 1
Following is an example of how to configure a high risk alert to be triggered each time in a (Windows) session that users upload any file as a webmail attachment.

Example 2
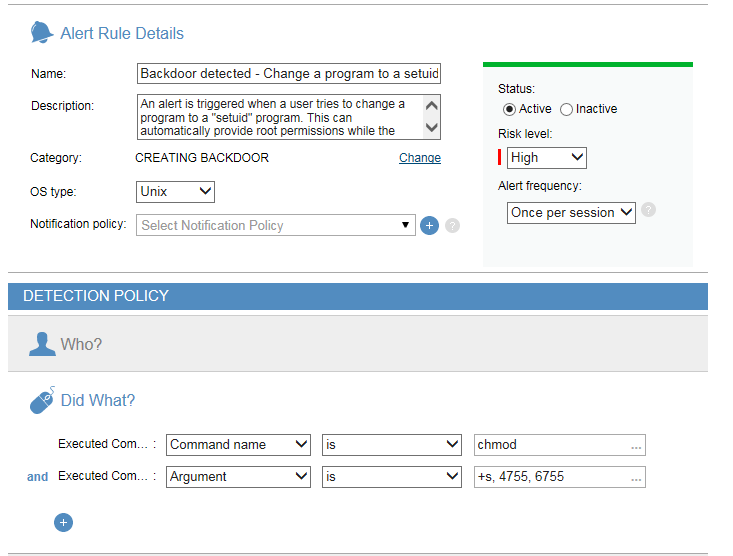
Following is an example of how to configure a high risk alert to be triggered each time in a (Unix) session that a user tries to change a program to a "setuid" program which would enable him to run commands with different user permissions.
In this case, the user executed the command "chmod" with arguments "+s, 4755, and 6755".
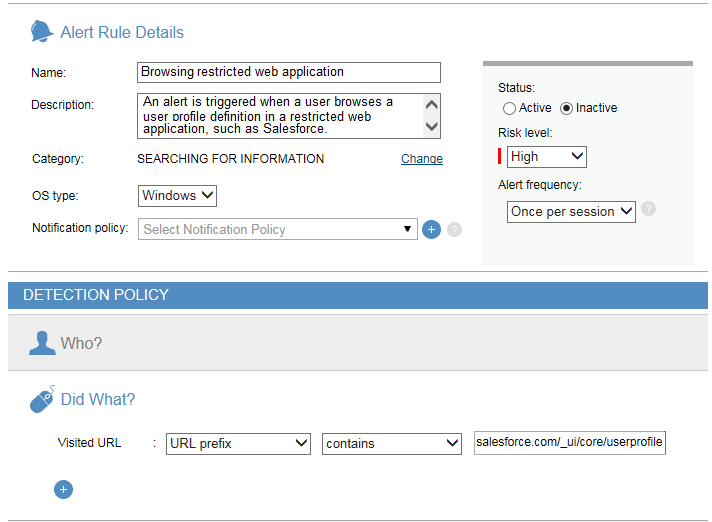
Example 3
Following is an example of how to configure a high risk alert to be triggered each time in a (Windows) session that users browse the user profile definition in the restricted Salesforce application.
In this case, the user visited a URL with a prefix containing "salesforce.com/_ui/core/userprofile".