Proofpoint | ObserveIT On-Premises Insider Threat Management
Managing Rule Categories
Assigning Rules to User Lists
The ObserveIT Insider Threat Library contains rules that cover the most common scenarios of risky user activities that might generate alerts. These rules have built-in policy notifications that are designed to increase the security awareness of users, and reduce overall company risk. ObserveIT’s Library of alert rules can be applied on Windows and Unix/Linux machines.
They are grouped according to security categories to help navigation and management.
Alert rules in the Insider Threat Library are already grouped into Categories and assigned to relevant User Lists with appropriate risk levels.
Categorization facilitates the operation and maintenance of rules and enables them to be grouped within similar security topics. Alert rules can be assigned to security Categories (such as, Data Exfiltration, Hiding Information and Covering Tracks, Running Malicious Software, Performing Unauthorized Admin Tasks, and more) in order to help navigation and facilitate rules operation and maintenance and enables rules to be grouped within similar security topics.
Each alert rule in the ObserveIT Insider Threat Library is associated with one Category. A rule that does not necessarily fit into one of the predefined categories can be associated with a special built-in category named UNCATEGORIZED.
The ObserveIT Website Categorization module automatically detects categories of Websites that end users are browsing, enabling alerts to be generated on browsing categories such as Gaming, Adults, Infected or Malicious Websites, Phishing Websites, and more. For details, see Website Categorization.
You can manage Categories from the Alert & Prevent Rules page of the ObserveIT Web Console.
This topic describes how to manage rule categories, including how to:
-
Manage categories of rules from earlier versions of ObserveIT
-
Change the order of categories displayed in the Alert & Prevent Rules table
-
Change the name of a category
-
Create a new category to which rules will be associated
-
Change a category to which a rule is associated
-
Delete a category
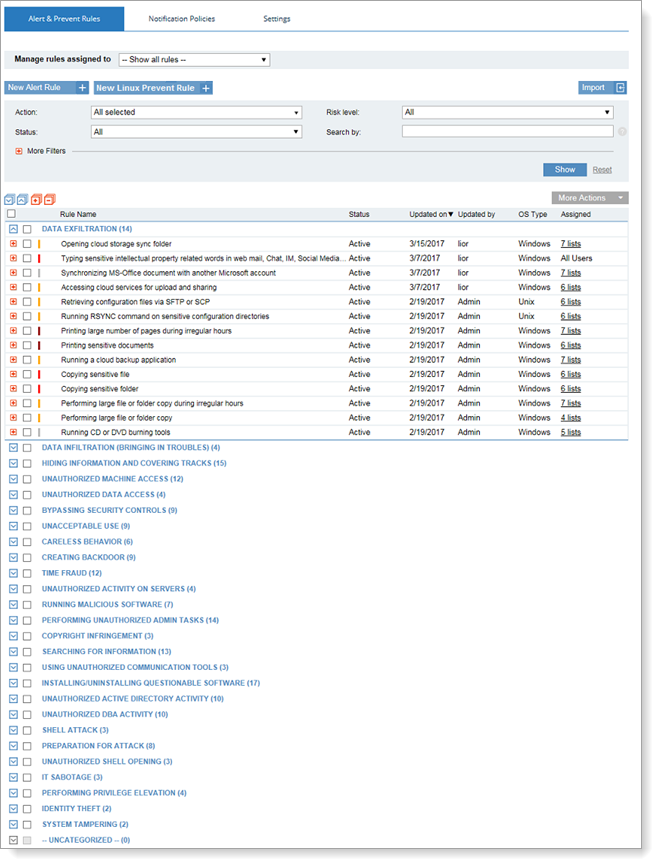
The Alert & Prevent Rules page displays a table showing the rules for all categories; the number of rules currently included are displayed in parenthesis next to each category. All categories are displayed; even those with no associated rules.
-
You can expand/collapse a category in order to display/hide its rules by clicking the
 and
and  icons.
 -
You can open or close all the rules in all categories at once by clicking the Expand All
 or Collapse All
  icons. Note that if the total number of rules for all expanded categories exceeds a predefined number, you cannot open them all at once.
 -
You can show or hide the full details for all rules within the open categories by clicking the Show Full Details
 or Hide Full Details
  icons.


Managing Categories of Rules from Earlier Versions of ObserveIT
When upgrading to ObserveIT version 6.7, any rules that were configured in earlier versions will be displayed under the following categories:
-
UPGRADED INACTIVE RULES: This category includes all rules that were inactive before upgrade. These rules are not assigned to any user. It is recommended that you delete them.
-
UPGRADED ACTIVE CANNED RULES, UNMODIFIED SINCE INSTALL: This category includes active canned rules that were not changed since installation. These rules are not assigned to any user. It is recommended that you delete them.
-
UPGRADED ACTIVE USER DEFINED OR MODIFIED CANNED RULES: This category includes upgraded active rules that were created or modified after installation. These rules are assigned to all users.
You cannot change the names of these categories.
Changing the Order of Categories
Categories are usually displayed according to their security importance but you can change this order, if required.
To change the order of a category in the table
-
Hover over the category that you want to move, and click the upward or downward arrow accordingly. For example:


When creating a new rule, you must choose a category in order to save a rule. If you click Save without first selecting a category, a popup opens reminding you to select a category. After choosing a category and clicking Save, the selected category is associated with the rule. When the rule is saved, it will appear in the Alert & Prevent Rules table.
Changing a Category Name
To change the name of a Category
-
Place the cursor on the name of the Category you want to rename. The text is highlighted enabling you to edit it. For example:

-
Click the Save button that appears when editing.

Creating or Changing a Category to which a Rule is Associated
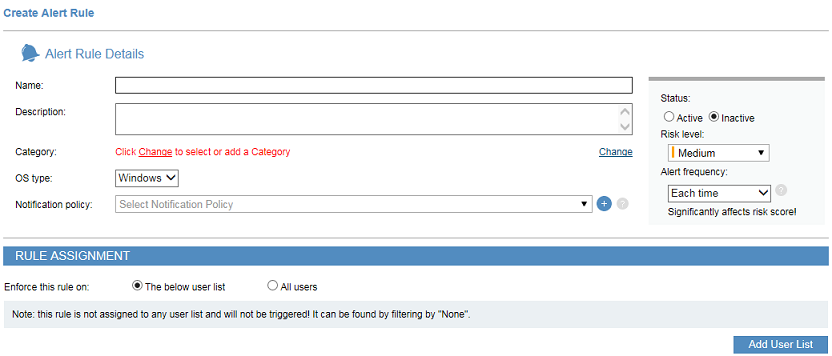
In the Alert/Prevent Rule Details area of the Create/Edit Alert/Prevent Rule page you can select or edit the category to which a rule is associated (including UNCATEGORIZED). You can also create a new category. Note that you cannot change the category of a System rule. See also Defining Rule Details.
Example of Alert Rule Details in the Create Alert Rule page:
Example of Alert Rule Details in the Edit Alert Rule page:
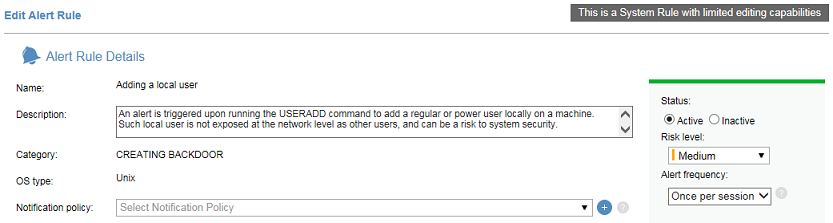
You cannot change the Category of this rule as it is a System rule.
To define a new category for the rule or change a rule's category
-
Click the Change hyperlink next to the Category field. Note that the Change hyperlink is not available if you are editing a System rule.
A Change Category scrollable window opens, enabling you to associate the rule with a category, change the currently associated category, or define a new category. For example:

-
If the required Category exists, select it in the list and click Save.
To define a new category for the rule:
-
In the text box, enter a name for the new Category, and click Add. (Note that a Category name cannot exceed 60 characters.)
-
Click Save. The new category is added to the Existing categories list.
-

Upon clicking Save, the popup closes and the newly selected/created category is displayed in the Alert Rule Details.
Deleting a Category
To delete a Category from the Alert & Prevent Rules page
-
In the Alert & Prevent Rules page, hover over the category that you want to delete, and click the Delete icon.

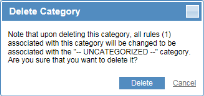
If the category is not empty, a warning popup is displayed:
-
Upon clicking Delete, all rules associated with the category will be re-associated with the "-- UNCATEGORIZED --" category.
The deleted category will no longer appear in the Alert & Prevent Rules page.

