Proofpoint | ObserveIT On-Premises Insider Threat Management
Installing the Website Categorization Module
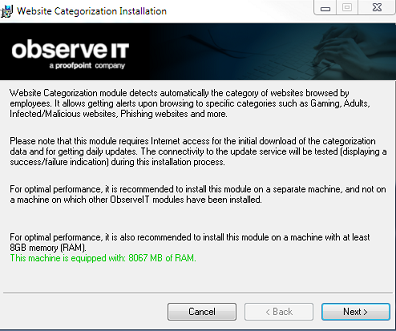
The ObserveIT Website Categorization module automatically detects categories of Websites that end users are browsing, enabling alerts to be generated on browsing categories such as Gaming, Adults, Infected or Malicious Websites, Phishing Websites, and more.
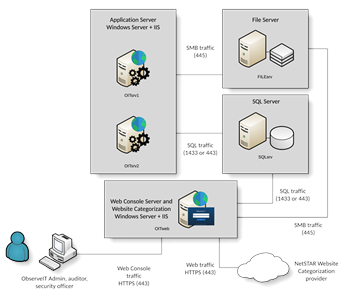
The diagram below shows the configuration including the Web Categorization module.
For details, see Website Categorization.
Website Categorization Prerequisites
In order to trigger alerts on Internet browsing, the Website Categorization module must be installed. The Website Categorization module can be installed on the same endpoint as the Web Console or on a separate dedicated endpoint (recommended).
Prerequisites for installing the Website Categorization module
- To download the initial data and receive updates directly from NetSTAR cloud service, your machine (that is, the server on which the Website Categorization module is installed), you must have Internet access.
If you don’t have Internet access you can use an HTTP proxy that will provide Internet access and allow the data download.
- Window Server 2016/2019 64 bit is required for this module.
-
Make sure that port number 443 is open, and that the URL https://nsv10.netstar-inc.com/dls020/get.cgi (that the module needs to access NETSTAR for initial data download and daily database updates) is not blocked by the Firewall.
-
Make sure that the following URLs are not blocked by the Firewall:
https://nsv10.netstar-inc.com (for DB download authentication) -
https://dss.netstar-inc.com (for DB download)
-
https://gcftelemetry.netstar-inc.com (for Telemetry)
-
-
12 GB minimum memory requirement.
-
Open port 8000 between the Application server and the Website Categorization.
-
Microsoft Visual C++ Redistributable
Installing the Website Categorization Module
System events related to installation of the Website Categorization module and download of the web categories database are generated by the system. For details, see Event Types.
-
ObserveIT databases installed (see Installing the ObserveIT Databases.)
-
Windows Server machine installed
-
Complete Active Directory Prerequisites, Firewall System Prerequisites, Back-end Components Prerequisites, Network Load Balancer Prerequisites and Digital Certificates Prerequisites
-
Credentials for the Active Directory Service Account
-
Connect (with RDP) to the server that will host the ObserveIT Web Console component as the Active Directory Service Account.
-
Download the ObserveIT installer into
c:\tempand extract the contents. (See Downloading the Latest Version.)(Assume the installer files are extracted to
c:\temp\ObserveIT_Setup_vx.xx.y.yypath, wherex.xxthe major ObserveIT version, andy.yyis the minor version and build.) -
Run PowerShell as Administrator.
-
From the table below, copy the rows from Command column, replacing the values as applicable. The Values to Replace column indicates which values you will need to replace.
Paste the commands into the PowerShell window.
Command Values to Replace $observeitInstallerPath = "c:\temp\ObserveIT_Setup_vx.xx.y.yy"Replace the generalized path with the correct path for your ObserveIT installer. For example: C:\temp\ObserveIT_Setup_v7.11.0.25 $SQLServer = '<# FQDN of the SQL Server #>'Replace the commented section with FQDN of your SQL Server $DNSForestName = "<# enter your DNS domain name here #>"Replace the commented section with the DNS domain name of your Active Directory. For example: domain.local. $Creds = Get-Credential$ComputerName = (Get-WmiObject -Class Win32_ComputerSystem).PSComputerName$MachineFQDN = $ComputerName + '.' + $DNSForestName$OutputDestination = 'C:\temp' -
When PowerShell prompts, Enter your Active Directory Service Account credentials here, enter the username in the format
DOMAIN\account. -
Configure Windows firewall to accept Website Categorization module requests:
New-NetFirewallRule -DisplayName "ObserveIT Web Categorization module" -Direction Inbound –Protocol TCP –LocalPort 8000 -Action allow -
Install the ObserveIT Website Categorization module component:
$ComponentInstallArguments = "/i", ($observeitInstallerPath + '\' +
'WebsiteCat\WebsiteCat_Setup.msi'), '/qb', "/norestart",
"DATABASE_SERVER=$SQLServer","DATABASE_LOGON_TYPE=WindowsAccount",
"SERVICE_USERNAME=$($Creds.GetNetworkCredential().Domain + '\' +
$Creds.GetNetworkCredential().UserName)",
"SERVICE_PASSWORD=$($Creds.GetNetworkCredential().Password)", "/leo",
"WebSiteCatMSI.log"
Start-Process msiexec.exe -ArgumentList $ComponentInstallArguments -
Wait -NoNewWindow
-
A new minimized Command Prompt window will appear. You can view Website Categorization module database download status by restoring the Command Prompt window that appeared right after the Website Categorization module installation is complete.
If your environment requires Internet proxy to access the Internet, see Configuring Internet proxy settings for Website Categorization module
Installing the module using a Custom installation
-
On the ObserveIT Application Server, open Windows Explorer and browse to the ObserveIT Installation folder.
- Open the WebsiteCat folder and double-click the WebsiteCat_Setup Installer package.

The installation process searches for the installed ObserveIT SQL Server database. The following message is displayed:
Gathering information for installing the Website Categorization module.
Please wait…If after gathering information, the ObserveIT database was not found, the following message is displayed:
SQL Server with ObserveIT databases was not found.
Please install ObserveIT databases before running the installation of the Website Categorization module.The installation checks whether the module is already installed on this endpoint; if it is, you can repair or remove it.
If the module is not already installed, the Website Categorization Installation wizard opens, displaying the following information.
- To continue, click Next.
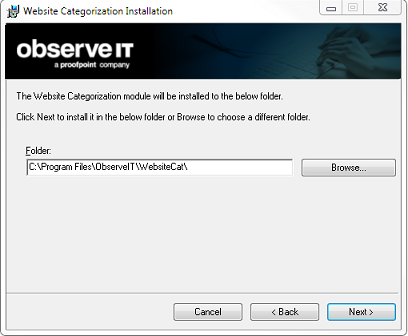
The default installation folder is displayed. If you want to change the default installation folder, click the Browse button and select the required folder.
-
Click Next.
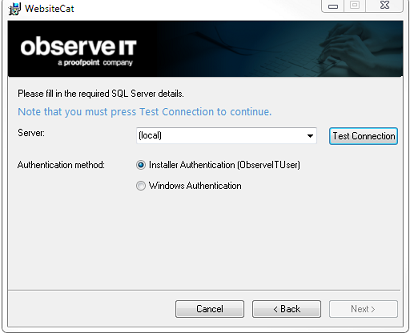
- Select the SQL Server with which the module will interact (the drop-down list includes SQL Servers which are already installed).
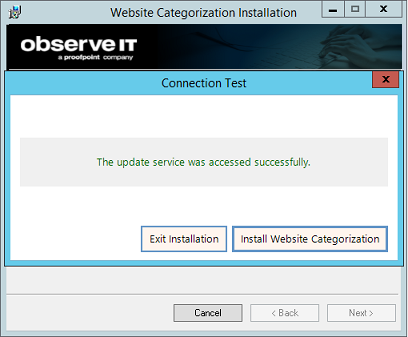
- Click Test Connection to check the status of connectivity to the server.
- Click Install Website Categorization to install the module (regardless of success or failure of the connectivity test).
-Or-
Click Exit Installation to abort the installation.
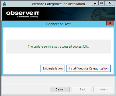
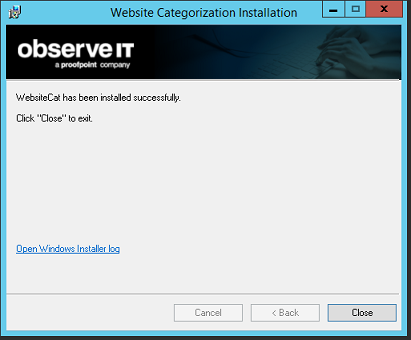
Upon successful installation of the module, the last screen of the wizard displays:
-
Click Close to exit the installation wizard.

Related Topic: