Proofpoint | ObserveIT On-Premises Insider Threat Management
Preparing the Client (Agent) Certificate for Mac in an mTLS Environment
This topic describes how to deploy a Mac Agent via JAMF in a Mutual TLS (mTLS) authentication environment.
For Mac Agents in an mTLS environment, the server certificate must comply with Apple Application transport Security (ATS) requirements.
mTLS encryption protocol is used to secure traffic for two parties authenticating each other at the same time. ObserveIT supports mTLS authentication between Client (Agents) and Application servers.
Prerequisite:
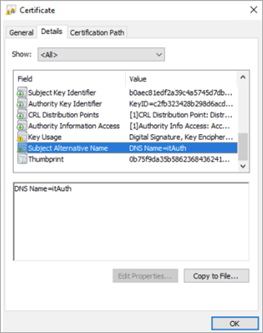
Certificate with Subject Alternate Name hard-coded with itAuth as shown in the image below.
From version 7.10.x, continue with Preparing the Certificate (from version 7.10.x)
If you are using version 7.9.x, continue with Preparing the Certificate (for version 7.9.x)
Preparing the Certificate (from version 7.10.x)
Before you begin, set the password for your Mac Agent certificate, see Securing Mac Agent Certificate for mTLS.
-
Create a separate working directory to store all .pkg content files, such as
WORKDIR=/tmp/workdir.Example:
mkdir -p /tmp/workdir -
Create a working directory for client certificates, such as
WORKDIR=/tmp/workdir/certs.Example:
mkdir -p /tmp/workdir/certs -
Copy the client certificate .pfx file, such as
CLIENT-i01-c01.pfx) to <temp/workdir/certs>Example:
cp CLIENT-i01-c01.pfx /tmp/workdir/certs -
Prepare the .pkg file. This will include the .pfx and .pem files.
Create a directory for the script.
Example:
mkdir -p /tmp/workdir/script -
From the .dmg file in the installation folder, copy
mtls_install_templatescript to the script directory.For more information about the .dmg file, see Mac Agent Files.
-
Rename
mtls_install_templatetopostinstall.Example:
mv mtls_install_template /tmp/scripts/postinstall -
Edit the
postinstall.pkgscript. You must include the following parameters.- INSTALL_DIR: location where the .pem <
CLIENT-i01-c01.pem> and .pfx <CLIENT-i01-c01.pfx> files will be created when deployed (for example, <$WORKDIR/install>. - CLIENTCERT_PFX_FILE: Name of the client certificate .pfx file. In the example,
CLIENT-i01-c01.pfx. - CLIENTCERT_PEM_FILE: Name of the client certificate .pem file. In the example,
CLIENT-i01-c01.pem. - PEM_PASS: Password for .pem file
For more information about the postinstall script, see postinstall script.
- INSTALL_DIR: location where the .pem <
-
Run the following command to create the .pkg.
/usr/bin/pkgbuild --identifier com.it.pkg.cert --version 1.0.0.0 --root $WORKDIR/certs --scripts $WORKDIR/scripts --install-location $WORKDIR/install $WORKDIR/install/mtls_cert.pkgIn this example:
$WORKDIR: is the name of the directory you created.
Preparing the Certificate (for version 7.9.x)
-
Extract the certificate and convert it from .pfx (format used by Windows Agent) to .pem (format supported by Mac).
From the command line:
openssl pkcs12 -in <CLIENT-i03-cl22.pfx> -out <temp directory>/<CLIENT-i03-cl22.pem>where:
- <
CLIENT-i03-cl22.pfx> is an example of a certificate file name - <
CLIENT-i03-cl22.pem> is an example of a converted file name in .pem format - <
temp directory> is the location of the converted file
- <
-
Copy <
CLIENT-i03-cl22.pem> to the SSL certificates default OpenSSL location.By default certificates are located in the directory
/etc/ssl/certs.Use sudo command to copy:
sudo cp <temp directory>/<CLIENT-i03-cl22.pem> /etc/ssl/certsTo verify the location of certificates (if not located in the default OpenSSL directory), from the command line:
openssl version -d
The output will display the location.Certificate is ready for registration.
Removing Private Key Password
If the certificate is password protected, you must remove the password.
To remove the password:
Extract and concatenate the certificate, the CA key and the private key, removing the password.
For this example,
- Client certificate is stored in pfx file <
CLIENT-i03-cl22.pfx> - Password: <
pw>
-
Copy the .pfx file to a temporary folder.
cp <CLIENT-i03-cl22.pfx> <~/Desktop/tmp/certs/test>where:
- <
CLIENT-i03-cl22.pfx> is the certificate file - <
~/Desktop/tmp/certs/test> is the temporary folder
- <
-
Change directory and navigate to the temporary folder.
.
cd <~/Desktop/tmp/certs/test> -
Extract the certificate: <
certificate.crt>openssl pkcs12 -clcerts -nokeys -in <CLIENT-i03-cl22.pfx> -out <certificate.crt> -password pass:<pw> -passin pass:<pw> -
Extract the CA key: <
ca-cert.ca>openssl pkcs12 -clcerts -nokeys -in <CLIENT-i03-cl22.pfx> -out <ca-cert.ca> -password pass:<pw> -passin pass:<pw> -
Extract the private key: <
NewKeyFile.key>openssl pkcs12 -nocerts -in <CLIENT-i03-cl22.pfx> -out <private.key> -password pass:pw -passin pass:<pw> -passout pass:<TemporaryPassword> -
Remove the password.
openssl rsa -in <private.key> -out <NewKeyFile.key> -passin pass:<TemporaryPassword> -
Concatenate to a new file. In the example the new file is <
CLIENT-i03-cl22.pem>:cat <NewKeyFile.key> <certificate.crt> <ca-cert.ca> > <CLIENT-i03-cl22.pem> -
Copy to the directory with the certificates, by default
/private/etc/ssl/certs:cp <CLIENT-i03-cl22.pem> /private/etc/ssl/certs
Related Topic: