Agent Default Deployment on Windows
This topic describes how to manually deploy an ObserveIT Agent on a Windows-based server using the default deployment method.
Although manual deployment of the Agent is straightforward and requires little user input, in many scenarios, the Agent is deployed on many servers and the manual installation of each Agent increases the administrative overhead required to deploy ObserveIT. For this reason, the Agent can be easily configured to automatically install itself by using a batch file. For details on how deploy the Agent using a batch file, see Automated Installation.
For information about the minimum system requirements for installing ObserveIT Windows Agents, see System Requirements for ObserveIT Components.
From version 7.12.0, before deploying, you must download the JWT file with authentication details.
The downloaded file will be valid for the specified number of days. When the file expires, it cannot be used for additional installations. Make sure the file will not expire before you have time to complete the installation. It is suggested that you set the number of days to 180. For security reasons, after successful installation, it is recommended that you remove the file.
(See Configuring Service Settings.)
To install the Windows Agent using the default method
-
From the ObserveIT installation folder, open the WinAgent64Bit folder or WinAgent32Bit folder depending on your operating system.
- Double-click the WinAgent64bit.msi (or WinAgent32bit.msi) file.
The ObserveIT Agent Installation Setup Wizard opens.
-
Click Next.
- Accept the terms in the end user license agreement, and click Next.
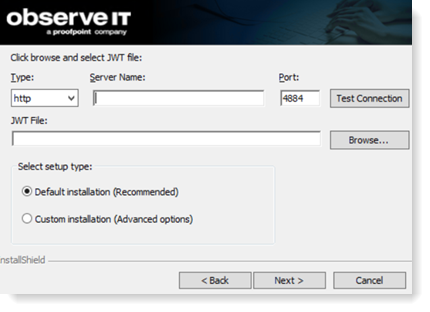
The following dialog box opens, enabling you to specify the Application Server location and setup type.
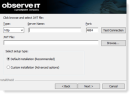
- Specify the Application Server URL location:
Select http or https.
Enter the location of the JWT file that you previously downloaded.
Enter the server name or accept the default server name as defined in the DNS auto configuration.
DNS auto configuration is done by querying the DNS server, and locating an SRV Record named _oit._tcp.domain-name.suffix for the machine that provides the ObserveIT Application Server services. The information from DNS is inserted into the Agent configuration, and when properly configured, it allows the Agent to communicate with the correct server by using the correct TCP port. In the case of https (SSL connections), the Agent searches for an SRV Record called _oits._tcp.domain-name.suffix. For further details, see Using DNS to Enable Agent Auto Configuration.
Port. By default, ObserveIT listens to TCP port 4884. When accepting the default settings during the installation of the ObserveIT Application Server, all the ObserveIT Agents will communicate with the ObserveIT Application Server by using TCP port 4884. If you choose to install the ObserveIT Application Server by using a different TCP port, enter that port number in the Server URL.
You cannot use an Application Server with a software version that is earlier than the software version of the Agent. In this case, an error message will be displayed. The Application Server version must be equal to or later than the current Agent version.
-
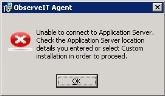
Click Test Connection to check the connection to the Application Server. You will receive notification if the connection was successful or not.

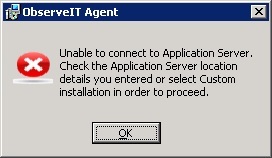
If the Application Server is down, you will receive the following message:
-
Select the Default installation setup type (by default it is already selected).
- Click Next.
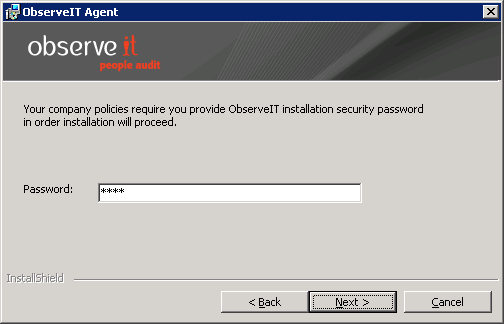
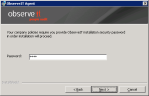
If the Application Server has been configured to require a security password on installation (see Securing ObserveIT Installations), you must provide the security password in the following dialog box, before proceeding.
-
Click Next to continue.
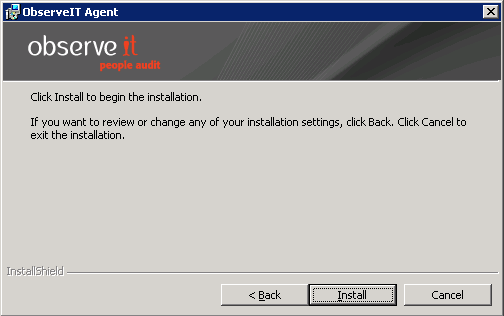
- Click Install in the following dialog box to begin the installation.

Installation should complete successfully.
-
Click Close. Note the Agent’s blue icon in the tray area.
- If the Agent’s installation fails, check connectivity issues.
Hint: Check the Windows Firewall on the ObserveIT Application Server, and either turn it off or add the relevant rules to allow Agent connectivity (incoming TCP 4884). If required, note the error message and contact support.
After installing the Agent no reboot is required; recording will start immediately in the current user's session. In some cases, such as on Terminal Servers with multiple concurrent sessions, users that have concurrent sessions will be asked to log off and log back in again before their sessions will be recorded.
In order to verify that user activity recording is working properly after Agent installation, follow the steps described in Verifying Successful User Activity Recording after Installation.