Scheduling an Archive Job
Archiving jobs can be launched manually or can be scheduled for automatic periodic archive rotation. By scheduling archiving, you can select a date range for the archived data or an "older than" parameter.
In addition, for legal hold or other purposes, you can specify users/endpoints whose sessions you want to exclude from archiving.
It is recommended that you schedule the archive to be performed when activity on the endpoint is minimal (for example, weekends, nights). It is also recommended to schedule the archive on a daily basis so that each archive does not contain too much data.
The following steps are required to schedule a job for archiving:
-
Set Scheduler mode to Archive.
-
Specify a date range for the archived data.
-
Select the archive time settings.
-
If you want to exclude sessions of specific users, add any users/endpoints you want to exclude to the Exclude Users and Endpoints table.
Notes:
You can disable the archiving mechanism by setting the Schedular mode to Disabled.
Alternatively, you can schedule a job to entirely delete session data (screnshots and metadata). For details, see Deleting ITM On-Prem (ObserveIT) Session Data.
To schedule a job for archiving
-
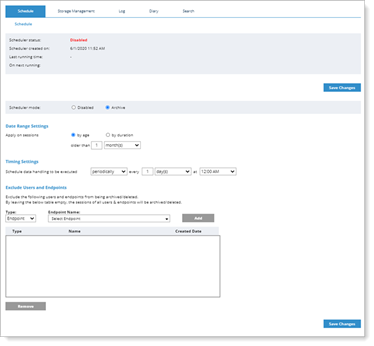
Navigate to Configuration > Storage Management > Archive.
The Schedule tab opens by default.
In Scheduler mode area, select Archive.
-
In the Date Range Settings section, specify how to apply the archiving, by selecting one of the following options:
-
by age: Archive data that is older than a specified number of Days, Weeks, or Months. All sessions older than this will be archived. Note that you cannot select a time range that is less than three days from the current time on the database. The default date range is older than 1 month.

-
by duration: Archive data in the specified date range.

-
-
In the Time Settings section, schedule how to execute the data handling job you scheduled. Options are:
-
once on: the job executes at regular intervals. For example every weeks on Sunday at 12:00 am.

-
once now: the job executes on a specific date and time.

The job executes when you click Save Changes
Consider the performance impact on the production database server, and make sure that you only run the job during off peak hours.
-
-
In the Exclude Users and Endpoints sections, select the users/endpoints whose sessions you don't want archived. These users/endpoints will not be archived until you remove them from the list. (Removal will take effect at the next scheduled archive/delete job.) To remove, select the user/endpoint and click Remove.

- From the Type dropdown, select Endpoint or User.
-
From the Endpoint Name/ Domain and Login Name dropdown, select the endpoint or user.
(To find a user/endpoint name quickly, start typing the name. This will narrow down the search.)
- Click Add.
- When you have finished defining the archive job schedule, click Save Changes to save the settings.
- After you click Save Changes, information is displayed about the job status (Active, Disabled, Pending, Running), when the job is next scheduled to run, and the number of sessions and screenshots that will be processed in each instance.

After the job schedule starts, the job status will switch to Running and the sessions will be copied to the archive storage. After all the sessions have been copied, they will be deleted from the production database/file system storage.

If you selected an archive job schedule of to run once, after the job runs, the status reverts to Disabled.


Related Topic: