Manually Upgrading the Database
The ITM On-Prem (ObserveIT) Database upgrade can be done on the server on which the ITM On-Prem (ObserveIT) Web components are installed, that is, the server that has IIS installed, and where the Web and Application components are already installed, or directly on the server running SQL Server (if different).
Manually upgrade the ITM On-Prem (ObserveIT) Database by upgrading the DB and DB_Analytics folders.
The upgrade process should complete without any issues. However, because upgrading the ITM On-Prem (ObserveIT) Database involves changes to the data, make sure that you have a valid and working backup before upgrading.
Manually upgrading the DB Folder
The DB folder contains the setup files for the ITM On-Prem (ObserveIT) SQL databases.
- Run the SQLPackage.exe file located in the DB folder which was created when you extracted the setup files from the archive.
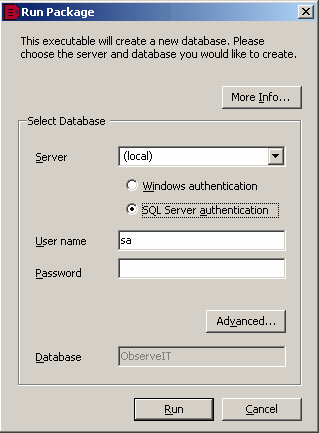
The Database Installer main window appears.

- Select the SQL Server on which to install the database.
When using the SQL Server Express Edition, if you manually type in the server name and the installation fails, try again using this format: servername\SQLEXPRESS, where servername is the name of the server on which the SQL Server is installed. This is also true for SQL Server instances. If the server to which you are installing the database is the local server, use this format .\SQLEXPRESS.
The SQL Server Express edition is not supported in a production environment, as it has database size limitations. It is recommended for use only in a testing environment.
Select Windows Authentication as the authentication method.
If the Full Text Search (FTS) module of Microsoft SQL Server was not installed before you began the upgrade, you will receive a prompt. If you want to install the FTS module after completing the upgrade, click Yes in order to execute a script that will initialize the database to use the module. Click No to abort the upgrade.
-
Click Run to begin the installation.
-
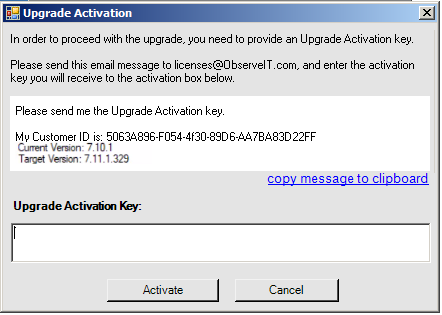
After the process begins, you will be prompted to enter the Upgrade Activation Key. For the procedure for a upgrade activation key, see Activating the ITM On-Prem License.
- When you receive the key by email, paste it in the text box area and click the Activate button.
If you cannot obtain the key at this time, click Cancel to cancel the upgrade process. No changes will be made to the application or database.

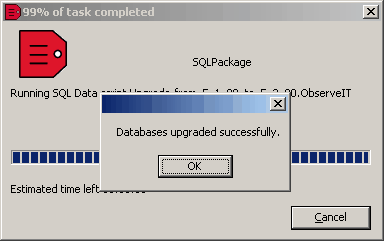
If the upgrade process was successful, a verification message appears, confirming that both ITM On-Prem (ObserveIT) Databases were upgraded successfully.
- When you receive the key by email, paste it in the text box area and click the Activate button.
If you cannot obtain the key at this time, click Cancel to cancel the upgrade process. No changes will be made to the application or database.
If the upgrade process was successful, a verification message appears, confirming that both ITM On-Prem (ObserveIT) Databases were upgraded successfully.