Detecting the Printing of Files
The ObserveIT detection mechanism helps to prevent data exfiltration by enabling security and risk analysts to track any user attempt to print sensitive or confidential data.
The detection mechanism enables security and risk analysts to:
-
Receive an immediate alert (and email notification) upon printing a sensitive document with a specific title, allowing analysts to respond quickly (for example, approach the employee, lock an account).
-
Search for the printing of specific documents by the title of the printed file, as part of forensic analysis.
-
Generate detailed reports on print operations for audit and compliance requirements.
-
Increase the risk score of users in the ObserveIT User Risk Dashboard, allowing administrators to quickly pinpoint users who put the business at risk and understand why.
The detection and monitoring of printing operations is automatically enabled.
Upon a user attempt to print files or documents, ObserveIT immediately captures the titles of the files, the printer, and the number of pages being printed. ObserveIT enables you to differentiate between the printing of large documents and standard size print operations. By default, the threshold for large print operations is configured as 10 pages.
Attempts to print files or documents can also be detected by ObserveIT’s reporting and alerting mechanisms, and reflected in the Endpoint/User diaries and the Session Player. Using the ObserveIT Search mechanism, you can search for documents that were printed and view the results within the context of the user activity. Users can define alerts when sensitive files are being printed, pop up a notification or blocking message, generate reports, and search for specific files being printed (see Types of Data You Can Search For).
On Windows systems, you can detect printing from all types of applications, such as, Office documents (Word, Excel, PowerPoint), text documents (Notepad, Notepad++), photos or images, Web content (via a browser), and so on.
The launching of a print job can be detected by any of the following methods:
-
Standard menu item: File > Print
-
Right-click menu item: Print
-
Clicking a Print button or icon.
- Using the CTRL+P keyboard shortcut
You can detect printing to any of the following types of printer:
-
Local printer (attached via a cable)
-
Network printer accessed via LAN
-
Network printer accessed via Wi-Fi
-
Print to PDF file
-
Print to Fax
- Print to other popular formats such as Microsoft OneNote application or Microsoft XPS Document Writer
After a print action is detected, a screenshot is created with the following information:
-
Process name and application name defined by the application from which the Print action was initiated.
-
If the Print action was initiated from a browser, the URL and Website nameof the currently browsed page.
- Window title displaying the following information:
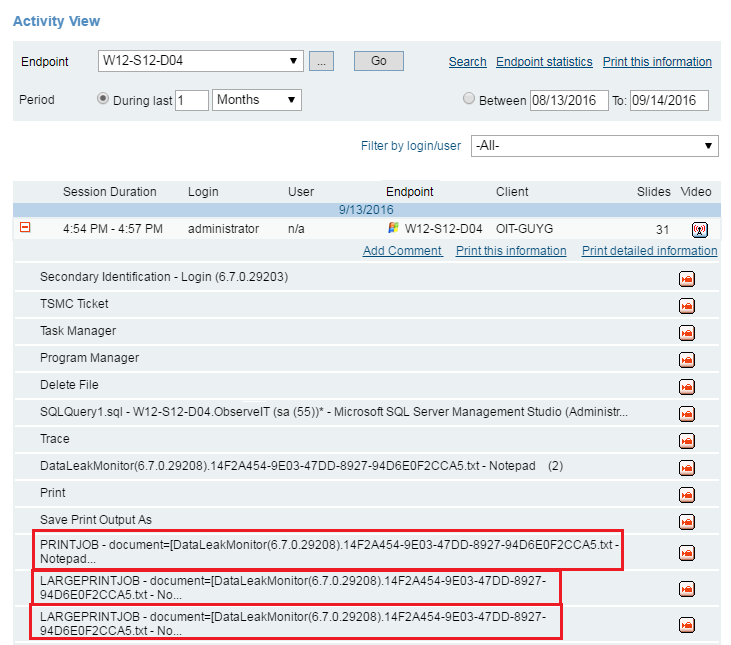
Prefix text PRINTJOB or LARGEPRINTJOB (to help the search, alert, and report mechanisms easily identify the action).
The title of the document or file that is being printed.
The name of the printer and the machine on which it is installed.
Number of pages that were sent to the printer.
For example: PRINTJOB - document=[<doc name>], printer=[<printer name>], num-of-pages=[<num of pages>]
If the number of pages that were sent to the printer exceeds the predefined threshold (by default, 10), the prefix LARGEPRINTJOB is used. For example:
LARGEPRINTJOB - document=[<doc name>], printer=[<printer name>], num-of-pages=[<num of pages>]
Viewing Print Operations in the Web Console Diaries
Following is an example of how the detection of standard and large print operations appear in the Endpoint Diary within the ITM On-Prem Web Console.
See Also