Managing Requests for User Exposure
When "Anonymization" is enabled, all personal user information is hidden unless specifically requested and approved to be exposed. In the User Exposure Requests page of the Web Console, you can view a list of requests for user exposure that were made during a specified time period and according to specified criteria.
Privacy Officers are the only Web console users who are permitted to manage requests for user exposure including changing the status of requests. A Privacy Officer must enter a password upon first time access to the User Exposure Requests tab. For details, see Defining a Password to Configure User Privacy.
You can view and manage requests for user exposure from the Configuration > Security & Privacy > Security & Privacy > User Exposure Requests tab of the Web Console.
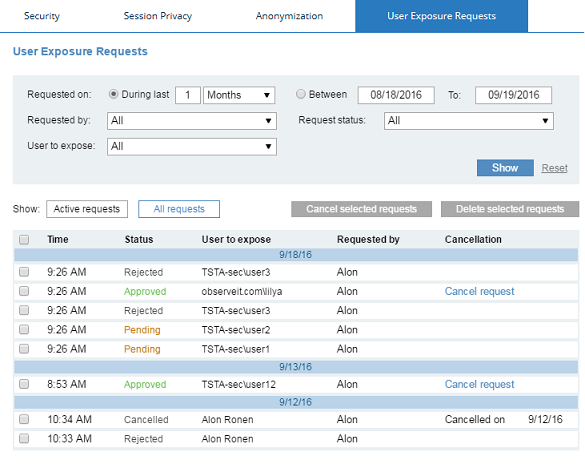
User exposure requests are displayed according to the specified filter criteria in reverse chronological order, so that the most recent requests appear at the top of the list.
By default, the list displays all requests that are currently active (that is, with Pending or Approved status). To display all requests regardless of their status, click the All requests button.
For each request in the list, the following information is displayed:
-
Time: time that the request was made.
-
Status: current status of the request (Pending, Approved, Canceled, Expired, or Rejected).
-
User to expose: domain and login name (or Active Directory name) of the user for whom the request was made.
-
Requested by: Web Console user that requested to expose the user.
-
Cancellation: if a request is in Approved status, this field provides a Cancel request link enabling you to cancel the request. If a request is in Canceled status, this field displays the date of cancellation. If the request was Expired, the expiration date is displayed.
To filter the display criteria:

-
Alongside Requested on, select the required time period or date range for the request(s) that you want to view.
-
From the Requested by list, select the Web Console user that made the request(s) that you want to view (or select All to view requests from all Web Console users).
-
From the Requested status list, select the status of the request(s) that you want to view (or select All to view requests for all statuses). Available statuses are: Pending, Approved, Canceled, Expired, Rejected.
-
From the User to expose list, select the name (domain name and login) or Active Directory name (if it exists) of the user whose personal details you want to expose (or select All to view requests for all users).
-
When you have finished defining your search criteria, click Show to update the list according to the specified criteria.
To clear the filter fields, click Reset.
Other tasks you can perform from the User Exposure Requests page
In addition to viewing a list of user exposure requests, from the User Exposure Requests page, you can:
-
View and configure details about each exposure request. See Viewing and Configuring Exposure Request Details.
-
Approve an exposure request. See Approving an Exposure Request.
-
Cancel an exposure request. See Cancelling an Exposure Request.
-
Delete an exposure request. See Deleting an Exposure Request.
You can export User Request Exposure data to SIEM systems. For details, see Integrating Logs into SIEM Systems.