Installing ITM On-Prem (ObserveIT) Application Server
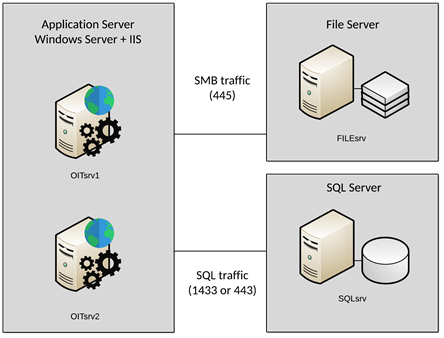
The ITM On-Prem (ObserveIT) Application Server is the data ingestion component. It receives and processes the raw data received from the ITM On-Prem (ObserveIT) Agents.
Depending on the sizing and architecture of the product deployment, you must install one or more ITM On-Prem (ObserveIT) Application Server(s).
This Application server is installed after you install the database and file server.
This topic describes how to install and verify the ITM On-Prem (ObserveIT) Application Server component on the first server. If you have multiple Application Servers, you need to repeat this procedure for each machine.
Do not attempt to install ITM On-Prem (ObserveIT) server-side components over the network. Always use a local copy of the installation files.
Installing the Application Server with PowerShell
You can use the following PowerShell commands to install the ITM On-Prem (ObserveIT) Application Server. (This is the recommended procedure.)
Optionally, you can use the Application Server manually, see Installing ITM On-Prem (ObserveIT) Application Server (Manual).
Prerequisites:
-
ITM On-Prem (ObserveIT) Databases installed (see Installing the ITM On-Prem (ObserveIT) Databases.)
-
Windows Server machine installed
-
Microsoft SQL Server Standard Edition installed
-
SQL Server is configured to accept network connections on port 1433
-
Complete Active Directory Prerequisites, Firewall System Prerequisites, Back-end Components Prerequisites, Network Load Balancer Prerequisites and Digital Certificates Prerequisites
-
Credentials for the Active Directory Service Account
-
Connect (with RDP) to the server that will host the ITM On-Prem (ObserveIT) Application Server as the Active Directory Service Account.
-
Download the ITM On-Prem (ObserveIT) Installer into
c:\tempand extract the contents. (See Downloading the Latest Version.)(Assume the installer files are extracted to
c:\temp\ObserveIT_Setup_vx.xx.y.yypath, wherex.xxthe major ITM On-Prem (ObserveIT) version, andy.yyis the minor version and build.) -
Run PowerShell as Administrator.
-
From the table below, copy the rows from Command column, replacing the values as applicable. The Values to Replace column indicates which values you will need to replace.
Paste the commands into the PowerShell window.
Command Values to Replace $observeitInstallerPath = "c:\temp\ObserveIT_Setup_vx.xx.y.yy"Replace the generalized path with the correct path for your ITM On-Prem (ObserveIT) Installer . For example: C:\temp\ObserveIT_Setup_v7.11.0.25 $SQLServer = '<# FQDN of the SQL Server #>'Replace the commented section with FQDN of your SQL Server $DNSForestName = "<# enter your DNS domain name here #>"Replace the commented section with the DNS domain name of your Active Directory. For example: domain.local. $Creds = Get-Credential$WebSiteName = 'ObserveITApplicationServer'$WebSitePort = "443"$WebSiteProtocol = "https"$ComputerName = (Get-WmiObject -Class Win32_ComputerSystem).PSComputerName$MachineFQDN = $ComputerName + '.' + $DNSForestName$ApplicationPool = "IIS:\AppPools\$WebSiteName"$WebSiteBinding = ":" + $WebSitePort + ":"$OutputDestination = 'C:\temp'$gmsaUser="1"Optional for gMSA account $hotStorage= ‘\\unc-path\’Replace the path with the correct path to your hot storage, $warmStorage= ‘\\unc-path\’Replace the path with the correct path to your warm storage, $archiveStorage= ‘\\unc-path\’Replace the path with the correct path to your archive storage, -
When PowerShell prompts, Enter your Active Directory Service Account credentials here, enter the username in the format
DOMAIN\account. -
Install the required Windows features:
Install-WindowsFeature Web-Server, Web-WebServer, Web-Common-Http, Web-Default-Doc, Web-Dir-Browsing, Web-Http-Errors, Web-Static-Content, Web-Stat-Compression, Web-Security, Web-Filtering, Web-App-Dev, Web-Net-Ext45, Web-Asp, Web-Asp-Net45, Web-ISAPI-Ext, Web-ISAPI-Filter, Web-Mgmt-Tools, Web-Mgmt-Compat, Web-Mgmt-Console, NET-WCF-Services45, NET-WCF-HTTP-Activation45 -IncludeManagementTools -
Create the directory and Microsoft IIS folder structures:
New-Item -Name ObserveIT -Path "C:\Program Files" -ItemType Directory New-Item -Name Web -Path "C:\Program Files\ObserveIT" -ItemType Directory Import-Module WebAdministration New-Item $ApplicationPool -Force New-Item IIS:\Sites\$WebSiteName -PhysicalPath 'C:\Program Files\ObserveIT\Web\' ` -Bindings @{protocol = $WebSiteProtocol; bindingInformation = $WebSiteBinding } -Force Set-ItemProperty IIS:\Sites\$WebSiteName\ -Name applicationpool -Value $WebSiteName -Force -
Require SSL for connections to the ITM On-Prem (ObserveIT) Application Server websites:
Import-Module WebAdministration
$ConfigSection = Get-IISConfigSection -SectionPath
"system.webServer/security/access" -Location "$WebSiteName"
Set-IISConfigAttributeValue -AttributeName sslFlags -AttributeValue
Ssl -ConfigElement $ConfigSection
Get-IISConfigAttributeValue -ConfigElement $ConfigSection
-AttributeName sslFlags
-
Disable IIS logging:
Set-ItemProperty -Path "IIS:\Sites\$WebSiteName" -Name Logfile.enabled -Value $false -
Configure the best-practice IIS Application Pool recycling settings:
Import-Module WebAdministration $AppPoolPath = "IIS:\AppPools\$ApplicationPool" # Set the Application Pool to recycle every 8 hours Set-ItemProperty $AppPoolPath -Name Recycling.periodicRestart.time - Value 0.08:00:00 Clear-ItemProperty $AppPoolPath -Name Recycling.periodicRestart.schedule $RestartAt = @('12:00', '20:00', '07:00') # Set recycling to occur at 12pm, 8pm, and 7am, when there's less load on the system New-ItemProperty -Path $AppPoolPath -Name Recycling.periodicRestart.schedule -Value $RestartAt -
Assign the provisioned TLS certificate to the ITM On-Prem (ObserveIT) Application Server website. (The TLS certificate was provisioned in Back-end Components Prerequisites.)
-
Right-click the Start Menu and click Run.
-
Type
inetmgrand click OK. -
In the Microsoft Internet Information Services management console, select and expand your server and then expand Sites.
-
Right-click the ObserveITApplicationServer website and click Bindings.
-
Select the row starting with https in the Site Bindings window and click Edit.
-
From the SSL certificate drop-down, at the bottom of the window, select your provisioned TLS certificate.
-
Click OK to apply the settings.
-
Click Close in the Site Bindings window.
-
Install ITM On-Prem (ObserveIT) Application Server prerequisites:
$NodeJSInstaller = $observeitInstallerPath + '\Web\PreRequisite_nodeServices.exe' $ComponentInstallArguments = "wconly=1", "sqlcli=1", "/install", "/quiet", "/norestart" ,"/log PreRequisite_nodeServices.log" Start-Process $NodeJSInstaller -ArgumentList $ComponentInstallArguments -Wait -
Assign Logon as Service Rights to the Active Directory Service Account::
function Set-LogonRight ($accountToAdd) { if ( [string]::IsNullOrEmpty($accountToAdd) ) { Write-Output "no account specified" exit } $sidstr = $null try { $ntprincipal = new-object System.Security.Principal.NTAccount "$accountToAdd" $sid = $ntprincipal.Translate([System.Security.Principal.SecurityIdentifier]) $sidstr = $sid.Value.ToString() } catch { $sidstr = $null } Write-Output "Account: $($accountToAdd)" if ( [string]::IsNullOrEmpty($sidstr) ) { Write-Output "Account not found!" exit -1 } Write-Output "Account SID: $($sidstr)" $tmp = [System.IO.Path]::GetTempFileName() Write-Output "Export current Local Security Policy" secedit.exe /export /cfg "$($tmp)" $c = Get-Content -Path $tmp $currentSetting = "" foreach ($s in $c) { if ( $s -like "SeServiceLogonRight*") { $x = $s.split("=", [System.StringSplitOptions]::RemoveEmptyEntries) $currentSetting = $x[1].Trim() } } if ( $currentSetting -notlike "*$($sidstr)*" ) { Write-Output "Modify Setting ""Logon as a Service""" if ( [string]::IsNullOrEmpty($currentSetting) ) { $currentSetting = "*$($sidstr)" } else { $currentSetting = "*$($sidstr),$($currentSetting)" } Write-Output "$currentSetting" $outfile = @" [Unicode] Unicode=yes [Version] signature="`$CHICAGO`$" Revision=1 [Privilege Rights] SeServiceLogonRight = $($currentSetting) "@ $tmp2 = [System.IO.Path]::GetTempFileName() Write-Output "Import new settings to Local Security Policy" $outfile | Set-Content -Path $tmp2 -Encoding Unicode -Force Push-Location (Split-Path $tmp2) try { secedit.exe /configure /db "secedit.sdb" /cfg "$($tmp2)" /areas USER_RIGHTS } finally { Pop-Location } } else { Write-Output "NO ACTIONS REQUIRED! Account already in ""Logon as a Service""" } Write-Output "Done." } Set-LogonRight "$($Creds.GetNetworkCredential().UserName)" -
Install the ITM On-Prem (ObserveIT) Application Server:
$ComponentInstallArguments = "/i", ($observeitInstallerPath + '\Web\AppServer\ObserveIT.AppServerSetup.msi'), "/qb", "/norestart", "DATABASE_SERVER=$SQLServer", "TARGETAPPPOOL=$WebSiteName", "TARGETSITE=$WebSiteName", "DATABASE_LOGON_TYPE=WindowsAccount", "SERVICE_USERNAME=$($Creds.GetNetworkCredential().Domain + '\' + $Creds.GetNetworkCredential().UserName)", "SERVICE_PASSWORD=$($Creds.GetNetworkCredential().Password)",HOT_STORAGE=$hotStora ge",WARM_STORAGE=$warmStorage, ARCHIVE_STORAGE=$archiveStorage,"/leo", ".\AppServerMSI.log"For gMSA user (recommended):
$ComponentInstallArguments = "/i", ($observeitInstallerPath + '\Web\AppServer\ObserveIT.AppServerSetup.msi'), "/qb", "/norestart", "DATABASE_SERVER=$SQLServer", "TARGETAPPPOOL=$WebSiteName", "TARGETSITE=$WebSiteName", "DATABASE_LOGON_TYPE=WindowsAccount", "SERVICE_USERNAME=$($Creds.GetNetworkCredential().Domain + '\' + $Creds.GetNetworkCredential().UserName)", "GMSA_USER=$gmsaUser","/leo", ".\AppServerMSI.log"For details about gMSA, see ITM Windows Install using gMSA Account.
Start-Process msiexec.exe -ArgumentList $ComponentInstallArguments -Wait -NoNewWindow -
Validate the ITM On-Prem (ObserveIT) Application Server is installed correctly:
add-type @"
    using System.Net;
    using System.Security.Cryptography.X509Certificates;
    public class TrustAllCertsPolicy : ICertificatePolicy {
        public bool CheckValidationResult(
            ServicePoint srvPoint, X509Certificate certificate,
            WebRequest request, int certificateProblem) {
            return true;
        }
    }
"@
[System.Net.ServicePointManager]::CertificatePolicy = New-Object TrustAllCertsPolicy
iisreset /start
Import-Module WebAdministration
Get-IISSite $WebSiteName | Start-IISSite
$CurrentURL = $WebSiteProtocol + '://localhost:' + $WebSitePort + '/ObserveitApplicationServer/v2/apis/health/_health'
Invoke-WebRequest $CurrentURL -UseBasicParsing
If successful, the PowerShell prompt returns several values. One of the top values will be the code 200.
Installing ITM On-Prem (ObserveIT) Application Server (Manual)
-
From the Command Prompt, select Run as administrator.
If prompted, Do you want to allow this app to make changes to your device?, select Yes.
-
Navigate to the folder with the extracted ITM On-Prem (ObserveIT) Installer. Navigate to the Web folder.
For example:
c:\Users\OITServiceAccount\Desktop\ObserveIT_Setup_vx.x.x.xx\Web -
Run PreRequisite_nodeServices.exe.
Check the check box with the message I agree to install the following products and click Install.
Wait for the installation to finish and then click Close.
-
From the command line, as an administrator, navigate to the folder with the extracted ITM On-Prem (ObserveIT) Installer. Navigate to the Web folder.
For example:
cd c:\Users\OITServiceAccount\ObserveIT_Setup_vx.x.x.xx\Web\AppServer -
Open the Start menu and type Command Prompt.
-
Right-click the Command Prompt shortcut icon and select Run as administrator.
If prompted Do you want to allow this app to make changes to your device?, click Yes.
-
From the command line, as an administrator, navigate to the folder with the extracted ITM On-Prem (ObserveIT) Installer . Navigate to the Web folder.
For example:
cd c:\Users\OITServiceAccount\ObserveIT_Setup_vx.x.x.xx\Web\AppServer -
Type ObserveIT.AppServerSetup.msi and Enter.
-
In the ITM On-Prem (ObserveIT) Application Server window click Next.
-
In the Site field, select ObserveITApplication.
-
In the Application Pool field, select ObserveITApplication. Click Next.
-
In the Server field, enter the details of the SQL server, in the following format:
<ServerFQDN>\<InstanceName>,<Port>For example:
SQLsrv.test.lab\ObserveIT,1433 -
Select the Windows Authentication radio button and enter the password for the current account – the ITM On-Prem (ObserveIT) Service Account - in the Password field. Click Test Connection.
If the test is successful, a success message displays.
-
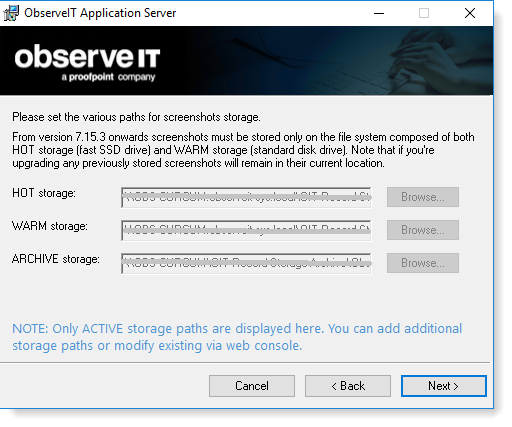
When prompted, add the path to HOT, WARM and ARCHIVE Storage. (If this is a new installation, these fields will be available. If this is an upgrade and you have already designated paths, the fields will be grayed-out.
-
Click Next. The installation begins.
After successful installation, click Close.
Related Topic: